Creating Snow Trails in Unreal Engine 4

If you’ve been playing recent AAA games, you may have noticed a trend in snow covered landscapes. A few examples are Horizon Zero Dawn, Rise of the Tomb Raider and God of War. In all of these games, one thing stands out about the snow: you can create snow trails!
Allowing the player to interact with the environment like this is a great way to increase immersion. It makes the environment feel more realistic and let’s face it — it’s just really fun. Why spend hours designing fun mechanics when you can just plop on the ground and make snow angels?
In this tutorial, you will learn how to:
- Create trails by using a scene capture to mask out objects close to the ground
- Use the mask in the landscape material to create deformable snow
- Only show trails around the player for optimization
Getting Started
Start by downloading the materials for this tutorial (you can find a link at the top or bottom of this tutorial). Unzip it and navigate to SnowDeformationStarter and open SnowDeformation.uproject. For this tutorial, you will create trails using a character and a few boxes.

Before we start, you should know that the method in this tutorial will only store trails in a defined area rather than the entire world. This is because performance depends on the render target’s resolution.
For example, if you want to store trails for a large area, you would need to increase the resolution. But this also increases the scene capture’s performance impact and render target’s memory size. To optimize this, you need to limit the effective area and resolution.
Now that we have that out of the way, let’s look at what you need to create snow trails.
Snow Trails Implementation
The first thing you need to create trails is a render target. The render target will be a grayscale mask where white indicates a trail and black is no trail. You can then project the render target onto the ground and use it to blend textures and displace vertices.

The second thing you need is a way to mask out only the snow-affecting objects. You can do this by first rendering the objects to Custom Depth. Then, you can use a scene capture with a post process material to mask out any objects rendered to Custom Depth. You can then output the mask to a render target.
The important part of the scene capture is where you place it. Below is an example of the render target captured from a top-down view. Here, the third person character and boxes have been masked out.

At first glance, a top-down capture looks like the way to go. The shapes seem to be accurate to the meshes so there should be no problem, right?
Not exactly. The issue with a top-down capture is that it does not capture anything underneath the widest point. Here’s an example:

Imagine the yellow arrows extending all the way to the ground. For the cube and cone, the arrowhead will always stay inside the object. However, for the sphere, the arrowhead will leave the sphere as it approaches the ground. But as far as the camera can tell, the arrowhead is always inside the sphere. This is what the sphere would look like to the camera:

This will cause the sphere’s mask to be larger than it should be, even though the area of contact with the ground is small.
An extension to this problem is that it is difficult to determine if an object is touching the ground.

A way to fix both of these issues is to capture from the bottom instead.
Capturing From the Bottom
Capturing from the bottom looks like this:

As you can see, the camera now captures the bottom side which is the side that touches the ground. This solves the "widest area" issue from the top-down capture.
To determine if the object is touching the ground, you can use a post process material to perform a depth check. This would check if the object’s depth is higher than the ground depth and lower than a specified offset. If both conditions are true, you can mask out that pixel.

Below is an in-engine example with a capture zone 20 units above the ground. Notice how the mask only appears when the object passes a certain point. Also notice that the mask becomes whiter the closer the object is to the ground.

First, let’s create a post process material to perform the depth check.
Creating the Depth Check Material
To do a depth check, you need to use two depth buffers. One for the ground and another for snow-affecting objects. Since the scene capture will only see the ground, Scene Depth will output the depth for the ground. To get the depth for objects, you just render them to Custom Depth.
First, you need to calculate each pixel’s distance to the ground. Open Materials\PP_DepthCheck and then create the following:

Next, you need to create the capture zone. To do this, add the highlighted nodes:
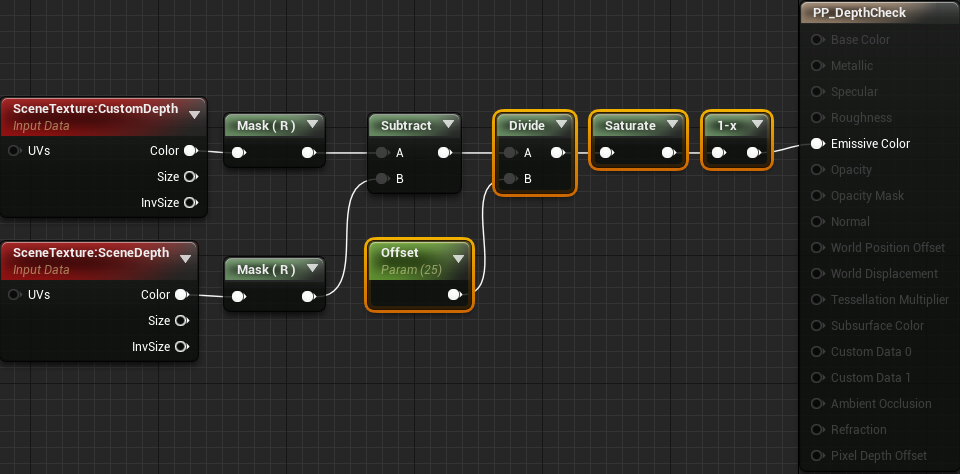
Now, if the pixel is within 25 units of the ground, it will show up in the mask. The masking intensity depends on how close the pixel is to the ground. Click Apply and then go back to the main editor.
Next, you need to create the scene capture.
Creating the Scene Capture
First, you need a render target for the scene capture to write to. Navigate to the RenderTargets folder and create a new Render Target named RT_Capture.
Now let’s create the scene capture. For this tutorial, you will add a scene capture to a Blueprint since you will need to do some scripting for it later on. Open Blueprints\BP_Capture and then add a Scene Capture Component 2D. Name it SceneCapture.

First, you need to set the capture’s rotation so that it looks up towards the ground. Go to the Details panel and set Rotation to (0, 90, 90).

Up next is the projection type. Since the mask is a 2D representation of the scene, you need to remove any perspective distortion. To do this, set Projection\Projection Type to Orthographic.

Next, you need to tell the scene capture which render target to write to. To do this, set Scene Capture\Texture Target to RT_Capture.

Finally, you need to use the depth check material. Add PP_DepthCheck to Rendering Features\Post Process Materials. In order for post processing to work, you also need to change Scene Capture\Capture Source to Final Color (LDR) in RGB.

Now that the scene capture is all set up, you need to specify the size of the capture area.
Setting the Capture Area Size
Since it’s best to use low resolutions for the render target, you need to make sure you are using its space efficiently. This means deciding how much area one pixel covers. For example, if the capture area and render target’s resolution are the same size, you get a 1:1 ratio. Each pixel will cover a 1×1 area (in world units).
For snow trails, a 1:1 ratio is not required since it is unlikely you will need that much detail. I recommend using higher ratios since they will allow you to increase the size of the capture area while still using a low resolution. Be careful not to increase the ratio too much otherwise you will start to lose detail. For this tutorial, you will use an 8:1 ratio which means the size of each pixel is 8×8 world units.
You can adjust the size of the capture area by changing the Scene Capture\Ortho Width property. For example, if you wanted to capture a 1024×1024 area, you would set it to 1024. Since you are using an 8:1 ratio, set this to 2048 (the default render target resolution is 256×256).

This means the scene capture will capture a 2048×2048 area. This is approximately 20×20 metres.
The ground material will also need access to the capture size to project the render target correctly. An easy way to do this is to store the capture size into a Material Parameter Collection. This is basically a collection of variables that any material can access.
Storing the Capture Size
Go back to the main editor and navigate to the Materials folder. Afterwards, create a Material Parameter Collection which is listed under Materials & Textures. Rename it to MPC_Capture and then open it.
Next, create a new Scalar Parameter and name it CaptureSize. Don’t worry about setting its value — you will do this in Blueprints.

Go back to BP_Capture and add the highlighted nodes to Event BeginPlay. Make sure to set Collection to MPC_Capture and Parameter Name to CaptureSize.

Now any material can get the value of Ortho Width by reading from the CaptureSize parameter. That’s it for the scene capture for now. Click Compile and then go back to the main editor. The next step is to project the render target onto the ground and use it to deform the landscape.
Deforming the Landscape
Open M_Landscape and then go to the Details panel. Afterwards, Set the following properties:
- Two Sided set to enabled. Since the scene capture will be looking from the bottom, it will only see the ground’s backfaces. By default, the engine does not render backfaces. This means it will not store the ground’s depth into the depth buffer. To fix this, you need to tell the engine to render both sides of the mesh.
- D3D11 Tessellation set to Flat Tessellation (you can also use PN Triangles). Tessellation will split a mesh’s triangles into smaller triangles. This effectively increases the resolution of the mesh and allows you to get finer detail when displacing vertices. Without this, the vertex density would be too low to produce a convincing trail.

Once you have tessellation enabled, World Displacement and Tessellation Multiplier will be enabled.

Tessellation Multipler controls the amount of tessellation. For this tutorial, leave this unplugged which means it will use the default value of 1.
World Displacement takes in a vector value describing which direction to move the vertex and by how much. To calculate the value for this pin, you first need to project the render target onto the ground.
Projecting the Render Target
To project the render target, you need to calculate its UV coordinates. To do this, create the following setup:

Summary:
- First, you need to get the XY position of the current vertex. Since you are capturing from the bottom, the X coordinate is flipped so you need to flip it back (if you were capturing from the top, you wouldn’t need to do this).
- This section will actually do two things. First, it will center the render target so that the middle is at (0, 0) in world space. It will then convert from world space to UV space.
Next, create the highlighted nodes and connect the previous calculation as shown below. Make sure to set the Texture Sample’s texture to RT_Capture.

This will project the render target onto the ground. However, any vertices outside of the capture area will sample the edges of the render target. This is an issue because the render target is only meant to be used on vertices inside the capture area. Here’s what it would look like in-game:

To fix this, you need to mask out any UVs that fall outside the 0 to 1 range (the capture area). The MF_MaskUV0-1 function is a function I built to do this. It will return 0 if the provided UV is outside the 0 to 1 range and return 1 if it is within range. Multiplying the result with the render target will perform the masking.
Now that you have projected the render target, you can use it to blend colors and displace vertices.
Using the Render Target
Let’s start with blending colors. To do this, simply connect the 1-x to the Lerp like so:

Now when there is a trail, the ground’s color will be brown. If there is no trail, it will be white.
The next step is to displace the vertices. To do this, add the highlighted nodes and connect everything like so:

This will cause all snow areas to move up by 25 units. Non-snow areas will have zero displacement which is what creates the trail.
Click Apply and then go back to the main editor. Create an instance of BP_Capture in the level and set its location to (0, 0, -2000) to place it underneath the ground. Press Play and walk around using W, A, S and D to start deforming the snow.

The deformation is working but there aren’t any trails! This is because the capture overwrites the render target every time it captures. What you need here is some way to make the trails persistent.
Creating Persistent Trails
To create persistency, you need another render target (the persistent buffer) to store the contents of the capture before it gets overwritten. Afterwards, you add the persistent buffer back to the capture (after it gets overwritten). What you get is a loop where each render target writes to the other. This is what creates the persistency.

First, you need to create the persistent buffer.
Creating the Persistent Buffer
Go to the RenderTargets folder and create a new Render Target named RT_Persistent. For this tutorial, you don’t have to change any texture settings but for your own project, make sure both render targets use the same resolution.
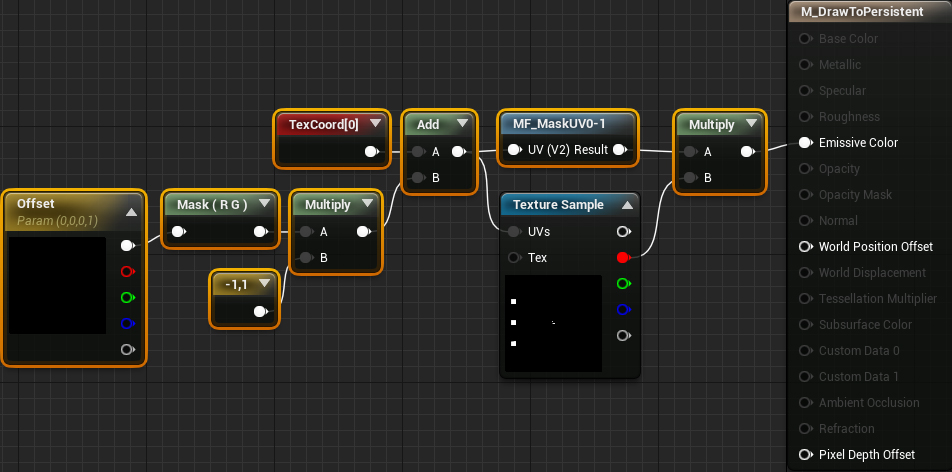
Next, you need a material that will copy the capture to the persistent buffer. Open Materials\M_DrawToPersistent and then add a Texture Sample node. Set its texture to RT_Capture and connect it like so:

Now you need to use the draw material. Click Apply and then open BP_Capture. First, let’s create a dynamic instance of the material (you will need to pass in values later on). Add the highlighted nodes to Event BeginPlay:

The Clear Render Target 2D nodes will make sure each render target is in a blank slate before use.
Next, open the DrawToPersistent function and add the highlighted nodes:

Next, you need to make sure you are drawing to the persistent buffer every frame since the capture happens every frame. To do this, add DrawToPersistent to Event Tick.

Finally, you need to add the persistent buffer back to the capture render target.
Writing Back to the Capture
Click Compile and then open PP_DepthCheck. Afterwards, add the highlighted nodes. Make sure to set the Texture Sample to RT_Persistent:

Now that the render targets are writing to each other, you’ll get persistent trails. Click Apply and then close the material. Press Play and start making trails!

The result is looking great but the current setup only works for one area of the map. If you walk outside of the capture area, trails will stop appearing.

A way to get around this is move the capture area with the player. This means trails will always appear around the player’s area.
Moving the Capture
You might think that all you have to do is set the capture’s XY position to the player’s XY position. But if you do this the render target will start to blur. This is because you are moving the render target in steps that are smaller than a pixel. When this happens, a pixel’s new location will end up being between pixels. This results in multiple pixels interpolating to a single pixel. Here’s what it looks like:

To fix this, you need to move the capture in discrete steps. What you do is calculate the world size of a pixel and then move the capture in steps equal to that size. Now each pixel will never end up inbetween other pixels and therefore no blurring occurs.
To start, let’s create a parameter to hold the capture’s location. The ground material will need this for the projection math. Open MPC_Capture and add a Vector Parameter named CaptureLocation.

Next, you need to update the ground material to use the new parameter. Close MPC_Capture and then open M_Landscape. Modify the first section of the projection math to this:

Now the render target will always be projected at the capture’s location. Click Apply and then close the material.
Up next is to move the capture in discrete steps.
Moving the Capture in Discrete Steps
To calculate the pixel’s world size, you can use the following equation:
(1 / RenderTargetResolution) * CaptureSize
To calculate the new position, use the equation below on each position component (in this case, the X and Y positions).
(floor(Position / PixelWorldSize) + 0.5) * PixelWorldSize
Now let’s use those in the capture Blueprint. To save time, I have created a SnapToPixelWorldSize macro for the second equation. Open BP_Capture and then open the MoveCapture function. Afterwards, create the following setup:

This will calculate the new location and then store the difference between the new and current locations into MoveOffset. If you are using a resolution other than 256×256, make sure you change the highlighted value.
Next, add the highlighted nodes:

This will move the capture using the calculated offset. Then it will store the capture’s new location into MPC_Capture so the ground material can use it.
Finally, you need to perform the position update every frame. Close the function and then add MoveCapture before DrawToPersistent in Event Tick.

Moving the capture is only half of the solution. You also need to shift the persistent buffer as the capture moves as well. Otherwise, the capture and persistent buffer will desync and produce strange results.

Moving the Persistent Buffer
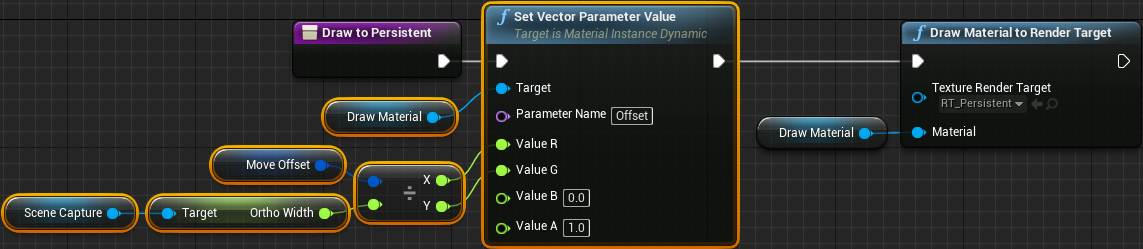
To shift the persistent buffer, you will need to pass in the move offset you calculated. Open M_DrawToPersistent and add the highlighted nodes:
This will shift the persistent buffer using the provided offset. And just like in the ground material, you also need to flip the X coordinate and perform masking. Click Apply and then close the material.
Next, you need to pass in the move offset. Open BP_Capture and then open the DrawToPersistent function. Afterwards, add the highlighted nodes:
This will convert MoveOffset into UV space and then pass it to the draw material.
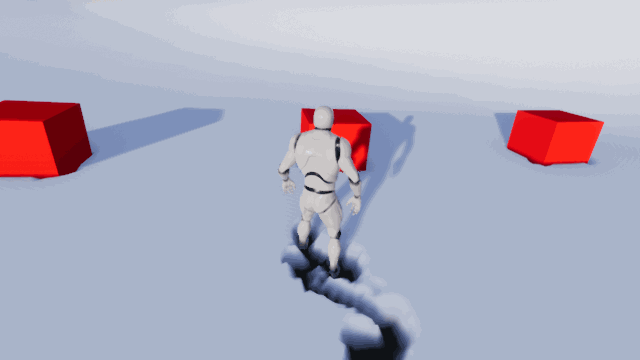
Click Compile and then close the Blueprint. Press Play and then run to your heart’s content! No matter how far you run, there will always be snow trails around you.
Where to Go From Here?
You can download the completed project using the link at the top or bottom of this tutorial.
You don’t have to use the trails in this tutorial just for snow. You can even use it for things like trampled grass (I’ll show you how to do an advanced version in the next tutorial).
If you’d like to do more with landscapes and render targets, I’d recommend checking out Building High-End Gameplay Effects with Blueprint by Chris Murphy. In this tutorial, you’ll learn how to create a giant laser that burns the ground and grass!
If there are any effects you’d like to me cover, let me know in the comments below!
The post Creating Snow Trails in Unreal Engine 4 appeared first on Ray Wenderlich.
from Ray Wenderlich https://ift.tt/2tQeiZQ

Comments
Post a Comment